One of the first Git commands people learn is
git status. It’s a great command to understand the state of
your personal repository, but it tells you nothing about the structure
of your teammates’ branches or remotes. Luckily, git log
visualises the state of a Git repository at any time, so we can
collaborate seamlessly.
This post is going to focus on this one, amazing command. Behold:
git log --graph --oneline --abbrev-commit --decorate --all

# That's borderlying fearsome! Let's make an alias:
alias gll="git log --graph --oneline --abbrev-commit --decorate --all"
Don’t worry about what all the flags are; if you’re really curious,
git help log explains them. What we care about is what
information this gives us, and how we can leverage it to collaborate
with confidence in a Git repo.
Have you copied the alias into your ~/.bashrc yet?
There’s no time like the present.
Using This Alias
When collaborating on a Git repo, it’s important to know how the
branch you’re working on relates to master, and all your
teammates’ branches. I might want to preview their code, combine the
feature I’m working on with theirs, take over on a certain branch, etc.
There are “black magic” Git incantations that will solve these problems
for you. The trick is knowing which one you need.
That’s where git log comes in. Git is really just a big
directed graph of commits, each one pointing to the one that came
before. At the top of the graph, sometimes these directed chains of
commits break off from one another. When this happens, we say that two
branches have “diverged.” Understanding where divergent branches are
pretty much the only trick to collaborating on Git repos.
So what does our gll alias do for us? It visualizes the
commit structure. In particular, if there are divergent branches, we’ll
see them:
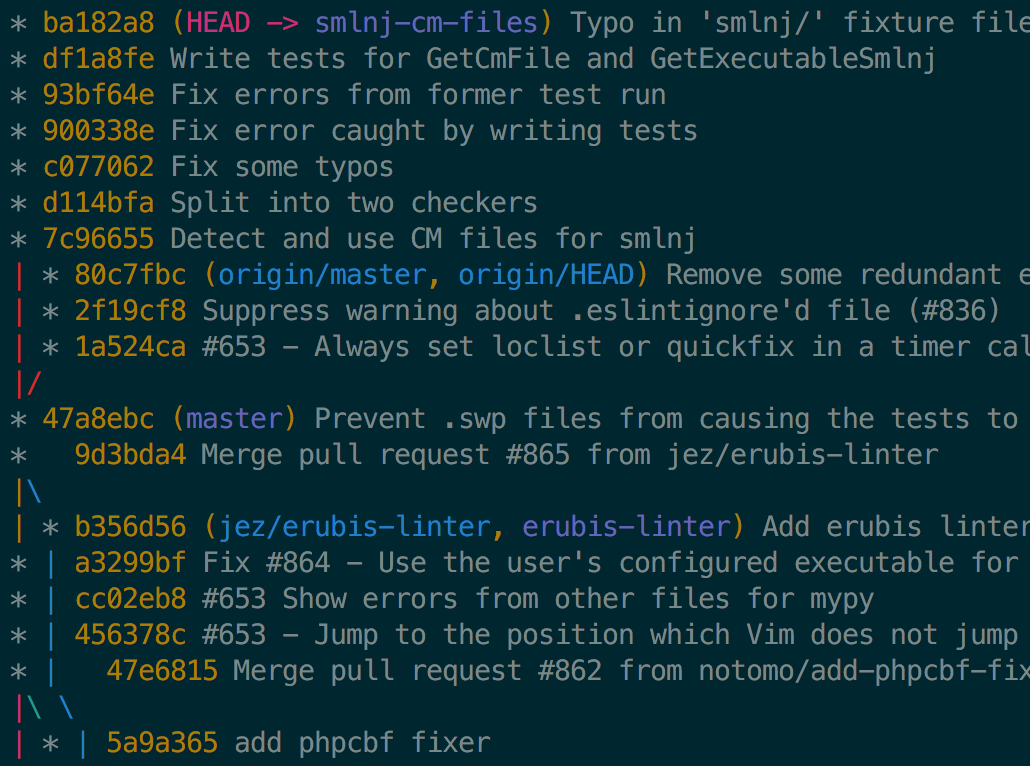
Some points about what we’re seeing here:
- Each
*represents a commit.- We can see information like commit hash and message next to it.
- The commits start with most recent at the top, and get older going down.
- Git is helpful enough to draw quaint little ASCII art lines connecting commits.
- Each commit is “decorated” with any references that point to that
commit.
- For example, ref
origin/masteris equal to commit80c7fbchere.
- For example, ref
And most importantly: with just a glance, we can see where the
divergent branches are. Our smlnj-cm-files forked off from
master. In the mean time, since we branched off, there were
three commits to master. This means we can expect some sort of merge or
rebase before including our code into master.
I find this command nothing less than miraculous when working with
Git. Between git status and gll, I can figure
out what command I need, or make a well-informed Google search with what
I’d like to do—these two commands answer all of my questions nearly
without fail.Many people I know who are quite competent at Git
manage to use it without gll. For me, gll is
indispensible. My theory here is that these poor people have such
intense muscle memory that they rarely, if ever, get their Git
repository into a state they’re unsure of. Rather than suffer through
that learning curve, here’s hoping that gll works as well
for you as it has for me!
Go Forth and Git
To recap: whenever you’re stuck: git status first,Why don’t I go in depth into git status as
well? Because git status almost always tells you the
command you want to run next! It’s actually pretty smart at this. Have
you read your git status output carefully recently?
and gll if needed. I’d recommend running
these commands even when you’re convinced you don’t need them just to
start learning to recognize “normal” and “weird” graph shapes.
Want to learn more about how to leverage Git branches? There’s an excellent interactive tutorial that visualizes Git branches basically the same way we covered in this post (but simpler), and even has fancy animations. For a taste of how it works, there’s also a non-interactive demo. After I ran through this tutorial, I felt for the first time like I really knew Git. I’m a huge fan—give it a look!
And if you’re hungry for more handy Git aliases or just some general ways to beef up your terminal experience, you can find these four aliases and more in the aliases.sh file in my dotfiles repository on GitHub.